
Acoustic Fittings and Accessories
Acoustic Panel Glue
The major benefits include:
* Low price
* Comes in a handy cartridge, with nozzle for easy application
* Crystal Clear - so any excess glue is invisible
* Instant grab - 3 seconds
* Super Strong bond to Plaster Board (GIB), Glass, Wood or Steel.
* Odourless
* Non-Drip
* MS Polymer Based
* Super Easy to apply

1. Walls & ceilings should be free of dirt and dust
2. Use a long screw/nail to puncture the protective seal inside the cartridge
3. Do not cut the supplied nozzle - it is already cut to the optimum size and shape
4. Screw the nozzle to the cartridge and place the cartridge in a caulking gun
5. Measure and mark the position of the installed panel on the wall, carefully using coloured masking tape
6. Apply a bead of glue around the 4 sides of the panel around 25-35mm in from each side and one wavy line of glue down the middle length of the panel
7. Immediately press the panel gently against wall/ceiling. For ceiling panels you should stretch the glue to add strength. To stretch the glue pull up one end of the panel by around 50mm while holding the other end firmly. You should see "strings" of glue between the ceiling and the panel. Reposition the panel slightly if necessary and press the panel firmly into place. Repeat this process for the other end of the panel.
NB This exposes the glue to the air as it is the moisture in the air that cures the glue.
NB This stretching procedure is not normally required for 9mm thick wall panels.
8. Do not leave the glue on the panel for any length of time. Apply glue and then immediately press the panel into place.
9. NB This glue has a very very fast grab time so take care to place the panel accurately. If the panel is not in the correct position immediately pull the panel from the wall/ceiling and replace in the correct position
10. Use a clean soft paint roller all over the panel surface to ensure a uniform bond
Cleanup
1. Use mineral turpentine
Health
1. May cause mild skin irritation (we have not experienced this).
2. Do not rub your eyes when using this product
Contents
MS Polymer based glue/sealant including:
Nano Calcium Carbonate, Dioctyl Phthalate, Calcium Carnonate, Polyether Modified Silane PrePolymer, Silane Coupling Agent, Catalyst Organic Tin
Ceiling Panel Suspension Kit


Suspending an acoustic ceiling panel by even 25-50mm doubles the mid and bass frequency sound absorption.
This is because acoustic panels are velocity absorbers i.e. when sound travels through a panel at full speed the panel with absorb 75% or more of that sound. However when the sound nears the ceiling it slows down. This has little or no effect on higher frequencies (voices) but it does have a significant effect on mid and bass frequencies (music).
See the below chart to see what effect suspension has on panel sound absorption performance.
Therefore Studios, Cafes, Bars and Home Theatres will benefit most by suspending ceiling acoustic panels.
These suspension kits not only look great and very professional - they also allow you to easily suspend panels with a spring loaded adjustment fitting at the panel end of the suspension wire. This is a quick and easy method for any handy person to suspend the panels and get them hanging straight.
The other major advantages of suspending panels are:
- Minimal damage to ceilings - just 4 tiny holes per panel.
- Maintenance - the panels are easily taken down and replaced for ceiling maintenance e.g. repainting.
Quantity - four kits are required to hang each panel.
NRC24mm = 0.75 (NRC = Noise reduction coeficient. A measure of a panel's overall sound reduction/absorption ranging from 0=zero to 1=100% absorption)
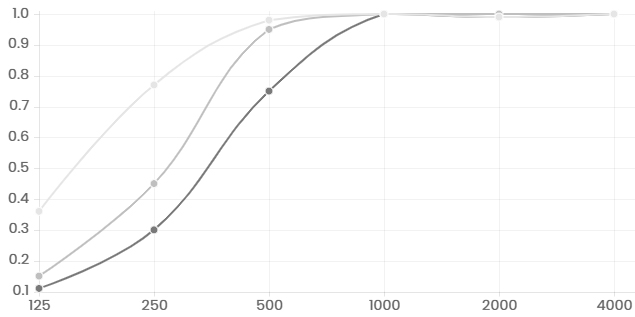
NRC performance by frequency
Gobo Feet


Adustable feet for Designer Acoustic Panels and Gobos.
These feet provide stability for Gobos or panels and are particularly useful where they are used to form acoustic walls or room partitions.
Popular in busy spaces e.g. Offices and Classrooms.
Two feet are required per Gobo or panel.
Pack Size - sold in packs of two.